Want a similar webpage for yourself?
Published:
During my “first” friendly yet long encounter with html scripts, I often asked myself: “Why endure this long fight?”. Every time, I shyly answered: To make someone’s long fight short
. For not fooling myself, or along the first principle of Ricahrd Feynman that you must not fool yourself – and you are the easiest person to fool.
, a blog post is born – to help you with your website. For those who are going ahead, wish you a Happy Website building
! All are welcome.
Instructions to get your website
This website is optimized for Grad students, who usually have representative image for each publications (Computer Vision, here I come!), who can contribute materials for teaching, talks, etc. (Educators, find this!) and write occasional blog posts (ahem). As I started building this website with zero knowledge of HTML scripts, sadly, I cannot ask for any pre-requisite (so for the html pros out there, sorry if I sound childish!). These are the steps:
- Register a GitHub account if you don’t have one and confirm your e-mail (required!). Refer here. When you choose a
Github username
, select it as yourdesired domain name
in mind, i.e., selectyour GitHub username
for the domain [your GitHub username].github.io. - Fork this repository by clicking the “fork” button in the top right. (spot “fork” button in Fig. 1).
- Go to the repository’s settings (see Fig. 1). Rename the repository “[your GitHub username].github.io”, which will also be your website’s URL. Next, scroll down this
settings page
to reach optionGithub Pages
and select the source asmaster branch
.
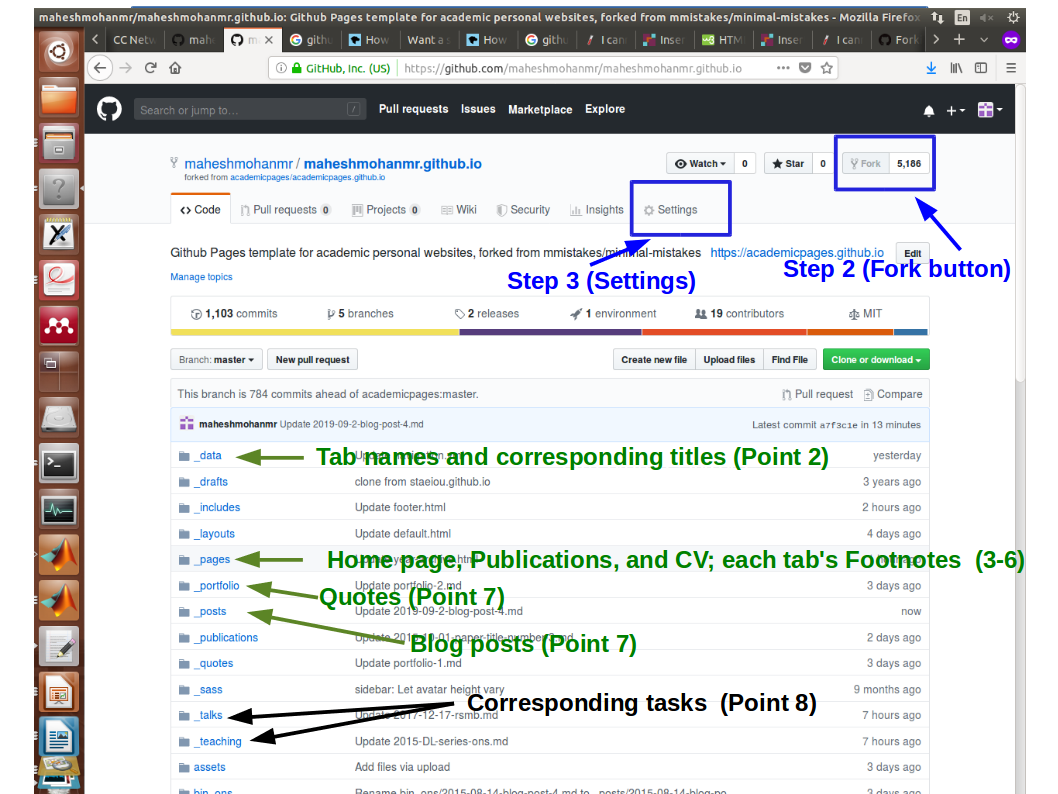
Forkand
Settingbuttons (blue) and
where to tweak(green, black)
Congratulations, now you have a website on your own. You can replace my data as follows
!.
Where to tweak for what?
(Note: I always consider the root as the outer one (./), i.e., the one in Fig. 1 where you can see the folders: _data, _drafts, etc. (For quick reference of where to tweak
, refer Fig. 1.)
- First, edit the ./_config.yml with your details, e.g., avatar for your profile picture; url and repository as your corresponding links; timezone; etc.
- Coming to the tabs and corresponding headers (i.e., Research Talks Teaching etc,), if you want to have something different (like Publications Projects Talks etc) change appropriately the ./_data/navigation.yml.
- Information of your home page can be set from ./_pages/_about.md.
- To change the publications, edit ./_pages/_publications.md. Note well that the image tag for each publications (that have eight occurences) need to be different for proper animations, e.g. the first paper here has
font_
as its tag. - CV can be set from ./_pages/_cv.md.
- The footnotes for each tab can be edited from ./_pages/
corresponding
.md files. - Contents for the tabs: Talks and Teaching can be changed using the files within ./_talks, and ./_teaching, respectively.
- Contents for the tabs: Quotes and Blogposts can be changed using the files within ./_portfolio, and ./_posts, respectively.
- For publications, there is no restriction of which folder to put files (e.g., pdfs and images, we put in ./_files, and ./_images, respectively) and invoke. To put, click upload button (right-top) and upload the files.
- However, images for blogposts need to be in ./asset folder for working (don’t know why).
- Editing a file, I mean, click the respective file, then click the pencil button (right-top), and edit. Once you finish editing, click
Commit changes
at the bottom. (After commiting, updates to the website shall happen within few minutes.).